How to Make a Terrarium
Ever wondered how you can bring a slice of nature indoors? A terrarium might be just the perfect project for you. Crafting a terrarium can transform a simple glass container into a thriving mini-ecosystem. This beautiful addition to any room not only adds a touch of greenery but can also be a rewarding DIY activity.
Picture this: a cosy, self-sustaining little world right on your coffee table. Terrariums have become all the rage, and for good reason. Whether you prefer open terrariums or the misty charm of closed ones, there are endless possibilities to design and personalise your green sanctuary. From selecting the right plants to adding decorative elements, the process can be both enjoyable and therapeutic.
Making a terrarium is simpler than you might think. With the right container, plants, and a few other essential materials, you can create a beautiful and low-maintenance addition to your home. Stick with us to dive into the steps and tips that will help you build a terrarium that thrives.
Key Takeaways
- Choose the right container and plants for your terrarium.
- Incorporate proper drainage and soil layers.
- Regular maintenance ensures a healthy and vibrant terrarium.
Creating A Terrarium – Required Parts

Let’s start by gathering our essential components for building an enchanting terrarium.
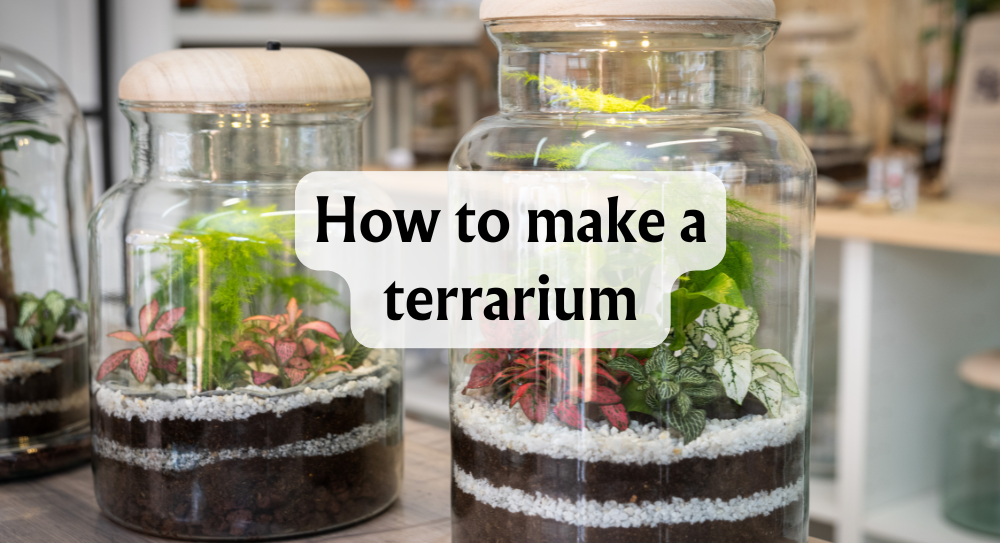
First, we’ll need a container. A glass jar or a glass container works best. It’s like creating a mini-ecosystem in a see-through capsule. Containers with lids are perfect for tropical plants, while open containers suit cacti and succulents.
For the plants, options abound. Succulents, ferns, polka dot plants, nerve plants (Fittonia), and miniature orchids are great choices. Tropical plants also thrive in terrariums.
Next, let’s focus on the growing medium. We need a good potting mix. For cacti and succulents, a special potting soil mix is ideal. For moisture-loving plants, standard soil or potting mix works fine.
Drainage materials are crucial. Start with a layer of gravel, pebbles, or stones at the bottom of your container. Top it with a thin layer of activated charcoal to keep the terrarium smelling fresh.
To add decorative elements, we can include sphagnum moss, small shells, sand, or colourful pebbles. These make our terrarium visually appealing.
Tools needed are simple:
- Long-handled tools for planting in deep containers.
- A spray bottle to maintain moisture.
- Scissors or pruning shears to trim plants.
There you go! With these parts, we can create a stunning terrarium. Let’s get our hands dirty and enjoy the process!
Choosing Your Container
When it comes to making a terrarium, the container is pretty much the star of the show.
Types of Containers
Let’s dive into some popular choices:
- Glass jars: Often easy to find and come in many sizes.
- Fish tanks: Great if you want to go big.
- Mason jars: A trendy choice that’s easy to seal.
- Glass bowls: Open and inviting for easy planting.
Factors to Consider
Choosing the right container depends on a few key things:
- Size: Do we want a mini-garden or a more expansive one?
- Shape: Cylindrical, spherical, or even something quirky?
- Opening size: A wider opening means easier access to arrange plants.
- Transparency: Clear glass lets us enjoy the view!
Open vs. Closed Containers
Here’s the lowdown:
- Open:
- Pros: Better airflow, less chance of mould.
- Cons: Needs frequent watering.
- Closed:
- Pros: Creates its own tiny ecosystem, less frequent watering.
- Cons: Risk of excessive humidity and mould.
Choosing the right container sets the stage for our little green world. Whether we go with a sleek glass bowl or a quirky mason jar, it’s all about what suits our style and needs. So let’s pick something that we love and get ready to create a beautiful terrarium.
Picking The Right Plant

Selecting the perfect plants for your terrarium can be a fun and creative process. Let’s dive in and find out what works best!
Suitable Plant Types
For closed terrariums, tropical plants are your best friends. They thrive in the humid, sealed environment. Think of mini rainforests!
On the other hand, open terrariums are ideal for succulents. They love good airflow and drier conditions.
Plant Compatibility
Not all plants play well together. It’s essential to choose plants with similar growth requirements. This ensures they all thrive in the same environment.
Size matters too. Make sure your plants have enough space to grow without overcrowding each other.
Popular Terrarium Plants
Here’s a cheat sheet of some popular plants to get you started:
For Closed Terrariums
- Fittonia (Nerve Plant): Perfect for adding a splash of colour.
- Peperomia: Known for its beautiful foliage.
- Moss species: Adds a lush green carpet effect.
For Open Terrariums
- Echeveria: Lovely rosette shape, thrives in well-drained soil.
- Haworthia: Hardy and requires minimal maintenance.
- Air plants (Tillandsia): Needs no soil, just spritz with water occasionally.
Remember, different plants bring different vibes to your terrarium. So, pick what speaks to you and watch your mini garden flourish!
Drainage Layers

When setting up a terrarium, getting the drainage layers right is crucial. Without proper drainage, the roots of our lovely plants could end up rotting. Nobody wants that! So, let’s get to it.
First things first, why do we need these layers? Drainage layers help prevent root rot by keeping excess water away from the roots. They also mimic natural soil layers, providing a more authentic environment for our plants.
Materials for Drainage
There are a few key materials we’ll need:
- Activated charcoal
- Pebbles or gravel
- Horticultural sand
Step-by-Step Layering Process
- Adding pebbles or gravel (1-2 inches)
Start by placing a 1-2 inch layer of pebbles or gravel at the bottom of your terrarium. This layer acts as the primary barrier for excess water.
- Sprinkling activated charcoal
Next, sprinkle a thin layer of activated charcoal over the pebbles. This helps keep our terrarium fresh by filtering water and preventing odours.
- Optional sand layer
If you want extra drainage, add a thin layer of horticultural sand above the charcoal. This is optional but can help improve water management.
By carefully layering these materials, we’ll create a robust drainage system that keeps our terrarium healthy and thriving.
Potting Soil

When it comes to choosing the right soil mix for our terrarium, we need to consider the types of plants we’re growing.
For tropical plants, go for a mix that’s rich in organic matter. Something like potting soil mixed with a bit of perlite does wonders. For succulents and cacti, we need a well-draining mix. A cactus soil mix with added sand or fine gravel works just fine.
Soil Layer Depth:
How deep should our soil layer be? It largely depends on the size of our container. Here’s a quick guide:
| Container Size | Soil Depth |
|---|---|
| Small (up to 4 inches) | 1-2 inches |
| Medium (5-10 inches) | 2-3 inches |
| Large (11+ inches) | 3-5 inches |
Creating contours and depth in our terrarium can add a lovely visual interest. Using chopsticks or long-handled tools, we can make little hills and valleys, giving our mini landscape some real character.
Don’t be afraid to get creative here!
Add Your Plants

Let’s get those plants ready! First, remove each plant from its nursery pot. If the roots are tangled or overly long, give them a gentle trim.
Next, create small planting holes in the soil. Make sure there’s enough space between each plant for growth.
When arranging, consider the design. Place taller plants at the back and shorter ones in the front. Mix textures and colours for visual interest.
Create a focal point with a standout plant to draw the eye. There you go, it’s coming together beautifully!
Decorative Touches

Adding decorative touches to your terrarium can make it truly unique and personal. Let’s talk about how we can spice things up a bit, shall we?
Natural Elements
One way to enhance the look is by incorporating natural elements:
- Rocks and pebbles: These can help create layers and add texture.
- Driftwood: Adds a rustic touch and is great for creating mini-scenes.
- Moss: Perfect for covering the soil and adding that lush, green look.
Miniature Figurines and Accessories
Another idea is to include miniature figurines and accessories:
- Fairy garden elements: Think tiny fairies, gnomes, and even mini toadstools.
- Miniature furniture: Small benches, lanterns, and tiny tables can make your terrarium like a small, enchanting world of its own.
Creating Scenes or Themes
Lastly, let’s consider creating scenes or themes to capture your imagination:
- Desert landscape: Use cacti, sand, and small rocks to bring this vision to life.
- Tropical rainforest: Combine ferns, bromeliads, and moist soil for a lush, vibrant effect.
- Zen garden: Minimalist design featuring sand, stones, and occasional greenery can create a calming vibe.
By paying attention to these elements, our terrarium can be more than just a plant display; it becomes a miniature world that tells a story.
Watering The Terrarium

Initial Watering
When we first water our terrarium, it’s essential to ensure even moisture distribution. We can use a spray bottle with fine mist settings to gently moisturise the soil. It’s crucial to avoid waterlogging. For smaller terrariums, a pipette can help us target specific areas.
Watering Frequency
The frequency of watering largely depends on whether our terrarium is closed or open.
-
Closed Terrariums: These create a self-sustaining ecosystem. They often need less frequent watering, sometimes only once every few months.
-
Open Terrariums: These require more attention. We might need to water them every one to two weeks, depending on the plant types and environmental conditions.
Signs of Over or Under Watering
Recognising signs of over or under-watering helps us adjust accordingly.
-
Overwatering: Look for condensation on the glass, mould, or a foul smell. We should open the terrarium to increase air circulation and allow some moisture to escape.
-
Underwatering: Dry soil, wilting plants, or fading leaves signal a need for more water. We can increase the watering frequency slightly until the plants look healthier.
By keeping an eye on temperature, light, and humidity, we can maintain a thriving terrarium. Adjustments might be necessary as the seasons change or if the terrarium’s location shifts. Let’s enjoy the relaxing process of nurturing our little green worlds!
Care Concerns

Keeping a terrarium healthy isn’t as challenging as it might seem. Let’s break it down:
Light Requirements
For an open terrarium, placing it near a window with indirect sunlight works best. Many of our favourite plants love a bit of natural light but not direct sunlight. They aren’t fans of being scorched!
Closed terrariums need less light. They tend to trap heat, so avoid placing them in direct sunlight.
Temperature and Humidity Control
Closed terrariums can get too steamy. Notice condensation? It’s time to give it a bit of air. Just open the lid for an hour or so.
Temperature-wise, aim for a steady 18-24°C. This keeps our greenery happy and thriving.
Pruning and Cleaning
Plants grow quickly, right? We need to keep our mini-gardens tidy. Use tweezers to trim overgrown foliage and remove dead leaves.
Trimming prevents plants from overcrowding and keeps them looking their best.
Fertilizing
Usually, terrariums don’t need a lot of fertiliser. If you choose to use one, go for a diluted liquid fertiliser and apply it sparingly, maybe once or twice a year.
Troubleshooting Common Issues
Mould Growth
Notice any funky white fuzz? Mould can be a problem. It’s usually due to too much moisture. Open lids for ventilation, and remove affected plants.
Pest Infestations
Tiny insects making an appearance? It’s rare but can happen. We can use insecticidal soap to keep them at bay.
Plant Etiolation (Stretching)
Plants looking a bit leggy? They’re stretching for light. Move the terrarium to a brighter spot, but avoid direct sunlight to stop them from burning.
Keeping these care concerns in mind helps maintain our terrariums as vibrant indoor gardens!
DIY Terrarium Projects
A. Mason Jar Herb Terrarium
Who doesn’t love having fresh herbs handy? A mason jar herb terrarium is perfect for your windowsill.
- Materials Needed:
- Mason jar
- Small pebbles
- Activated charcoal
- Potting soil
- Herb seeds (basil, thyme, etc.)
- Spray bottle
- Steps:
- Place small pebbles at the bottom of the jar for drainage.
- Add a thin layer of activated charcoal.
- Fill with potting soil, leaving some space at the top.
- Plant herb seeds as per packet instructions.
- Lightly mist the soil with a spray bottle.
B. Succulent Desert Terrarium
Succulents are all the rage for a reason! They’re low-maintenance and absolutely stunning.
- Materials Needed:
- Wide glass container
- Sand
- Cactus soil mix
- Succulents
- Decorative rocks
- Instructions:
- Pour a layer of sand into the container.
- Add cactus soil mix on top.
- Gently plant the succulents.
- Decorate with small rocks.
C. Tropical Rainforest in a Fish Tank
Transform a fish tank into a lush, tropical rainforest! This one’s for the adventurous among us.
- Materials Needed:
- Fish tank
- Small stones
- Activated charcoal
- Tropical soil mix
- Ferns, mosses, small tropical plants
- Spray bottle
- Creating the Ecosystem:
- Cover the bottom with small stones for drainage.
- Add a thin layer of activated charcoal.
- Fill the tank with tropical soil mix.
- Arrange ferns, mosses, and other plants.
- Mist regularly to maintain humidity.
Feeling inspired yet?
Conclusion
We’ve covered a lot of ground on how to create a terrarium, haven’t we?
Remember the basic steps: start with a good-quality container, add drainage layers, then potting soil, and finally your plants. Use activated charcoal to keep it fresh. Incorporate decorative elements to personalise your miniature garden.
It’s important to water appropriately and place your terrarium in a suitable location. Experiment with various plants and designs to find what suits your style.
Feel free to get creative and use unique containers and plant arrangements. There’s no right or wrong way – each terrarium is a reflection of your personal touch. Let’s keep exploring and enjoying the beauty of these tiny ecosystems!




 Store Locator
